Make it Sew | Bottle Gift Bag

Print instructions. Download Here.

This free project is suitable for any occasion, but we wanted to get festive with Tinsel by Clairice Gifford. An easy and fashionable Bottle Gift Bag would be perfect for a house warming, birthday or anniversary! It’s quickly becoming one of our personal go-to projects.

Make it Sew | Drawstring Fish Bag

fish_2

Sweetly paired with Underwater by Elizabeth Olwen, these little drawstring bags are really handy for holding smaller things, gift bags or even as a little purse for the littles. Here’s how to make your own.

Print out the PDF pattern pieces here.

Outer body:

Tail – cut 2 (solid)
Body – cut 2 (print)
Head – cut 2 (solid)
Batting for tail – cut 1
Lining – cut 2 (contrast solid)
2 buttons for eyes
2 18” drawstrings (1yd total)

Directions:

Use 1/4” seam allowance unless otherwise noted.

Outer body

  1. Sew tail to body, and body to head to make two full outer sides of the bag. Press all seams towards tail.
  2. Sew button to head in area located in diagram.
  3. Topstitch along the lower edge of the body/head seam.screen-shot-2016-12-08-at-1-49-48-pm
  4. With right sides together and laying the tail/batting on top of tail and sew along outer edge, sides and tail, keeping the “mouth” of fish open. Snip corners of tail and curves, turn inside out and press.screen-shot-2016-12-07-at-1-54-48-pm
  5. Topstitch at the tail/body seam. through all thicknesses (sealing off the tail).
  6. For tail details, stitch along the lines, or create your own stitched design.screen-shot-2016-12-08-at-2-08-31-pm
  7. At mouth, turn edge 1/2” inside and press.

Lining

  1. Sew sides and bottom, except for the area between the 2 marked points. Press seams open.screen-shot-2016-12-08-at-1-41-31-pm
  2. Turn right side out in order to topstitch around the holes as shown – this keeps the seam allowance tacked down. Then turn it back to wrong side out.screen-shot-2016-12-08-at-1-43-44-pm
  3. Fold on the line noted on pattern toward wrong (currently the outside) side and press.screen-shot-2016-12-08-at-1-46-49-pm

Assembly

  1. Slip the lining into the outer shell. Line up the opening of the holes on the sides so they meet the folded edge of the outer head. The “lips” should be exposed about 1/2”
  2. Pin around and ease any excess of the outer body to the lining.
  3. Topstitch at the top edge of the outer body.screen-shot-2016-12-08-at-1-50-18-pm
  4. Take one of the drawstrings and enter/exit for the right and tie a knot. Take the other and enter/exit from the left and knot. Pull both drawstrings to close.

Tutorial | Laminated Cotton Shower Cap

Here’s a quick and easy project and one perfect for our water-resistant laminates.

shower_cap_final

Sewing with our laminates is very similar to sewing with cotton. With a few small tips you can construct any items you would with other fabrics.

  • Using a resin foot attachment to your sewing machine or a similar type of foot that might be suggested by the maker of your sewing machine is essential or top stitching.
  • Use a test swatch of the fabrics (wrong sides together as in this pattern)
  • Adjust tension & stitch size (longer stitches work well for top stitching)
  • Guiding the fabrics from behind and the front of the foot will keep your pieces from moving

______

Laminate Shower Cap by Catherine Zebrowski

Materials:

  • Outer fabric (in laminate) -23” square
  • Inner fabric (in cotton or similar) – 23” square
  • Binding – at least 68” long bias binding. We made double fold 1/2” wide bias binding using lining fabric.  It is not recommended to do the binding in the laminate.
  • 1/4″ wide elastic at least as long as the measurement around your head + 2 inches.
Instructions:
  1. Draw a circle 20” in diameter on the face of the laminate in the center of the square. You can use a permanent marker – this will be a cut line later and the edge will be covered by the binding later.
  2. Place the squares wrong sides together and pin through both around the entire permitter of the square but important: be sure not to go inside of the 20″ circle,  Pin holes cannot be ironed out of the laminate..
  3. Top stitch through both pieces, placing your stitches 7/8 ” inside of the 20″ marked circle completely around.
  4. Cut through both fabrics along the 20″ circle marking.
  5. To bind: place the binding around the edge, covering the laminate and lining.  Top stitch around the entire cap sewing through both the top and the bottom of the binding at once.  When the end of the bias meets the start, leave a 1/2″ opening.
  6. Thread elastic in the casing that is created between the stitches and pin. Try it on and see if it needs tightening and adjust accordingly. Stitch both ends of the elastic together.
  7. Finish sewing the binding closed, tucking under raw edges.
Voila! You have an adorable new shower cap!

Limited Edition | Ribbon Box Quilt Kits

for_blog

Grey Abbey was our first collaboration with Elizabeth Olwen who has gone on to produce some our most beautiful and popular fabrics. The Ribbon Box quilt is also our most downloaded Make It Sew project. Furthermore, we get more requests for this quilt kit than for any other we’ve developed (and it’s worth noting that we do not even sell kits). So, it made sense that we bundle up some kits while we can.

But hurry, this is a limited edition kit (38 to be exact!) and once they’re gone, they’re gone – sadly, a number of these fabrics are no longer in stock.

To order, follow this link. The cost is $74.95 + shipping. International orders welcome. The kit includes a hardcopy of the pattern, the prints for the topper and the binding, but it does not include the white and backing.

Ribbon Box Quilt

Ribbon Box Quilt Closeup

for_blog2

Make it Sew | Stitched Valentines

KB_VD4This is a simple idea that’s full of possibilities. They could be made for any holiday or occasion. What’s really wonderful though is that it’s perfect for scraps and your little sewists. The directions are vague which is nice because it leaves room for interpretation. We had 4″ envelopes so we worked backwards from there.

KN_VD1Mo Willems’ Knuffle Bunny was a great fabric to use for young ones since it combines a favorite character and hearts!KB_VD5

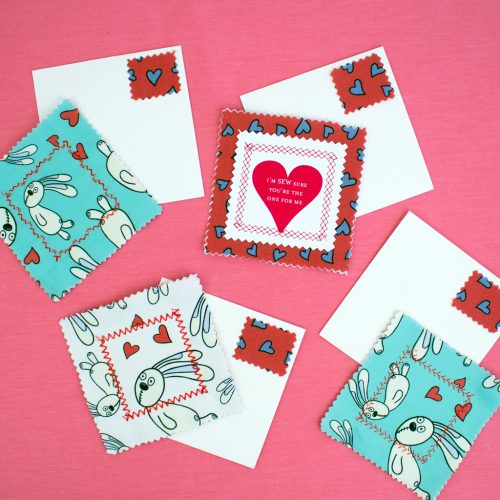
1. We printed out some sayings for a computer onto a stiff paper stock. This isn’t necessary, since you can always handwrite your Valentine’s Day wishes. As for size, we made the paper portion smaller so we could use fabric as a frame. So in this case, the finished size is for a 4″ envelope and the paper squares are about 3″ leaving 1″ in fabric border.

2. We cut fabric scraps roughly at about 5″ squares – enough so we didn’t have to line things up too strictly before sewing. Layering fabrics wrong sides together and placed the paper on top. We did not pin things because we didn’t want to leave a mark in the paper, but you could use spray glues if thought it would help for littler hands.

* We took the extra step in adding a layer of white fabric between the prints so they wouldn’t show though.

KB_VD3
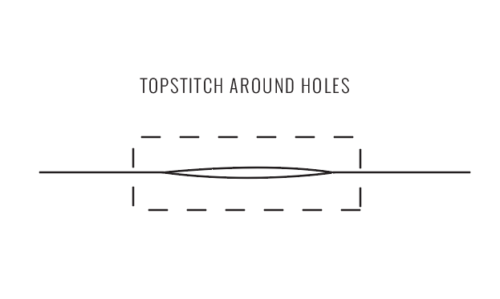
3. Using any stitch you like and sewing with the paper facing up, stitch around the edge of the paper. Trim loose ends.

4. Finally, trim the fabrics to the desired size with pinking shears.

5. For a finishing touch, we added fabric “stamps”.KB_VD2